How to make a shelf from an old chiffonier. Do-it-yourself restoration of Soviet furniture. Wrapping or painting a cabinet
The apartment has a Soviet-era wall, made of high quality natural wood. But over time, the facades warped, the fittings failed, the appearance became unpresentable. It’s a pity to throw away this piece of furniture, so many people have the question of how to update an old furniture wall with their own hands and they study photos before and after restoration.
Before starting any work, you need to prepare everything you need - buy material, tools. The list consists of the following:
- Furniture fittings;
- Putty material for wood;
- Facades, if necessary;
- Paint or stain (preferably spray);
- Construction knife;
- Building hair dryer;
- Screwdriver;
- Sharp scissors;
- Iron;
- Film furniture self-adhesive;
- Wax for furniture of different consistency;
- Candle;
- spatulas;
- Rags, clamp;
- PVA glue;
- Varnish for wood;
- felt-tip pen;
- Edge for processing end faces.
This is not the whole list of materials and tools, since there are several ways to update old furniture, each option has its own, specific set of necessary tools.


Update types
If you don’t know how to update an old furniture wall with your own hands, before and after photos can be found on the net. In addition, we present several ways, by applying which, you can give a second life to any furniture.
Restoration of an old wall
If old furniture is dear to you as a memory, but its appearance has suffered greatly over time - chips, creases, deep cracks have formed on the plane - it can be restored. After spending a minimum of time, you will receive an updated piece of furniture. For repair work, a standard set of material and tools is used. For a quality repair, it is enough to perform the following actions:
- The working surface must be cleaned and washed with a solution of soap and water, dried well - this will help increase the adhesion of the material to the wall facade;
- To save the plane from deep scratches, they are poured with melted wax. After the fill has hardened, you need to take a felt-tip pen to match the wood, put strokes on the wax that will imitate the structure of the wall material. This is not difficult to do, it is enough to continue an existing drawing. After that, a clean rag is taken, which is carefully carried over the hardened wax, smearing the dashes a little. As soon as the desired result is achieved, the plane is covered with furniture varnish;
- If strong scuffs are visible on the facade, they are painted over with varnish of the desired shade from a can;
- If there are cracks and delaminated sections on the facade, you can update the old wall with the help of elementary means - PVA glue, a medical syringe and a fixative. It is necessary to draw glue into the syringe, inject the required amount of the composition into the crack. Then press the split and remove excess glue. Using a clamp, press the area, leave to dry for 24 hours;
- Are there many chips on the facade? The same melted wax will help to cope with them. First you need to trim the edges of the chip with a spatula, and fill it with wax. Once the wax has dried, sand the area well with a clean, dry rag. Then perform the same steps as when repairing scratches and varnishing.
After such processing, the wall will not change its design, but its appearance will become much more attractive.

Removing dirt and dust from coatings

We process cracks with wax

Repairing chips with glue

We paint over scuffs
Transformation of the wall with furniture varnish
If the interior in your apartment has changed, and a simple restoration does not suit you, then you can radically change the old furniture with your own hands. There are several ways to update furniture, the choice of which will depend on artistic skills, preferences and the amount of free time.
The easiest way is varnishing. The process is not complicated, subject to the procedure and restoration technology.
The set of tools is standard, but for a good result, you need to follow the following algorithm:
- Take a picture of the wall before work begins. This will help in the future to collect it after the update without confusion;
- Disassemble the structure. It is necessary to remove the fittings and doors;
- Wash the wall and all components with soapy water;
- Remove dust, soot deposits in the corners with a toothbrush or toothpicks. This stage should not be ignored, since the quality of the final result depends on the preparation;
- Check the condition of the facades. If the surface is not badly damaged, then it will be enough just to cover it with varnish;
- If the facades are in a deplorable state, they have a lot of chips and deep scratches - the old coating is removed without residue. To make the work go faster, you can use special compounds that help remove varnish, or use a regular spatula;
- As soon as all the exfoliated areas are removed, the old varnish is removed, you can proceed with the restoration with wax - how to do it is described above;
- Sand the surface with fine-grained sandpaper and remove dust;
- Cover the facade of the wall and all components with 3-4 thin layers of furniture varnish. It is worth remembering that when applying a thick layer, streaks may form that will spoil the appearance of the wall;
- As soon as the varnish coating dries, the wall should be assembled, the fittings should be replaced with new elements.
By updating old furniture in this way, you can add a few more years of life to the wall in your interior.

Removing dust and dirt

We remove cracks

Removing old varnish

Lacquering in several layers

Installing new handles
Application of self-adhesive wallpaper
Today, there are a lot of materials that can be used for restoration. Updating old furniture with self-adhesive wallpaper is one of the easiest options. It is easy to work with this material, and it is inexpensive. In addition, the range is so large that you can choose the material for every taste. The film is waterproof, so it can protect the wall from environmental influences. The algorithm for performing work is as follows:
- Prepare as in the previous method - remove the fittings and disassemble the structure;
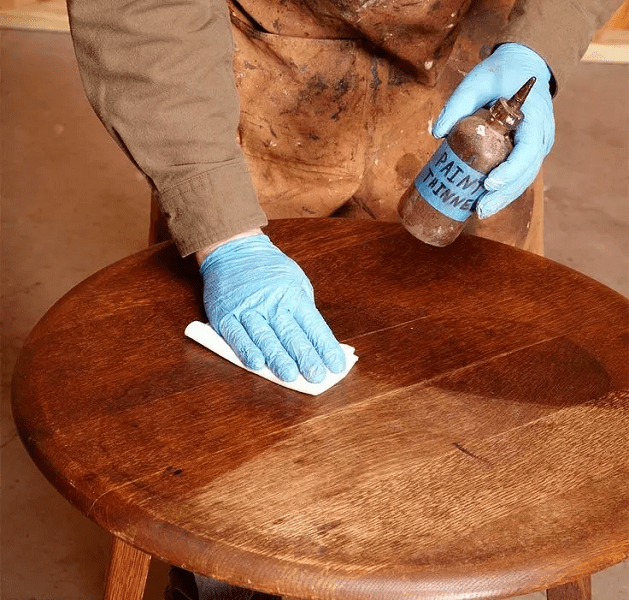
- Clean the facades, wash, after drying, treat the surface with white spirit, for degreasing;
- While the facades are drying, we cut the material. Film sheets should be 10 mm larger than the original size on each side. This is necessary in order to eliminate gaps in the finish;
- The surface on which the material is planned to be glued must be moistened. Attach the film to the upper edge, carefully separate a small strip of the protective layer. The film is glued gradually, slowly moving down;
- After gluing, you need to level the material with a soft rag, moving from the center to the edges;
- As soon as the entire wall is pasted over, you need to heat the iron and iron the plane through the fabric - this will help the film to adhere tightly to the surface;
- Return the doors and fittings to their place, stick the edge tape.
It is not necessary to use a film under the tree, you can choose any color. A competent design combination of different shades will help to make a real masterpiece out of an old wall.

Dismantling furniture

We clean the surface

We moisten the coatings

We glue the film

Collecting back
Restoration with staining
Repainting the old wall will change its appearance beyond recognition, while the main outlines will remain unchanged. You do not need artistic skills, as well as a special tool. The work is not difficult to do, just follow the basic rules:
- The wall is completely disassembled and the fittings are removed - this makes the restoration process much easier;
- The old coating must be completely removed, obvious flaws must be repaired with wax;
- Sand the surface after it dries with sandpaper or a soft cloth;
- Staining is done in several layers, while you need to make sure that there are no sagging and smudges. As soon as the staining is completed, we leave the structure to dry, after which the wall should be assembled.
If during the work an influx formed, which was detected after drying, it should be cleaned with sandpaper and additionally coated with paint. For a complete understanding of the staining system, see the master class for beginners on updating furniture with your own hands.
Work technology
Carrying out work for any type of restoration has one common technological sequence - preparation and updating itself.
Preparatory work
Before you decide to remake old Soviet-era furniture, you need to understand that such a process is justified only if it is made of wood. It is not advisable to update old furniture made of chipboard, since the service life of these structures is not long, and perhaps the wall is no longer suitable for restoration. So, there are preparatory measures that must be carried out before any restoration:
- Clean the surface of dust and dirt, while dismantling all the decor and accessories;
- Be sure to remove the old layer of paintwork. This can be done with a sandpaper with a large grain, or with a grinder. A solvent solution can also be applied;
- Grout deep cracks with a special material;
- Fill chips and dents with wax and sand;
- Prime the surface with wood compound. It is desirable to use acrylic compounds that fill all microscopic cracks.
The preparation stage is very important, since the final result depends on the quality of surface cleaning.

Removing dust and dirt

Removing old paint or varnish

We overwrite deformations

We prime the surface
Update instructions
Before restoring old furniture, you need to decide on the design that you want to get. Consider the most popular update method at the moment - decoupage. The preparatory work has been carried out with success, it is possible to proceed with the restoration. The algorithm for performing the work is simple and will not cause difficulty even for a beginner:
- Cut out the desired pattern, or take special napkins for decoupage. If you are working for the first time, take pictures of medium size relative to the surface on which they will be superimposed;
- Apply PVA glue to the plane, you can apply the composition for the blend. Do not smear the entire wall at once, as the glue may dry out while you are pasting over one area, so you need to work in stages;
- When gluing a picture, you must strictly monitor the fit of the edges to the surface. Drawings can be glued overlapping each other, so the decor will turn out to be voluminous and original;
- If you have to paste over the corner, then the material just gently bends around the corner, you do not need to cut anything. Smooth the picture with your fingers or with a rubber spatula to remove air bubbles and leave to dry;
- The next step is varnishing. Apply a thin coat of clear furniture polish with a brush or lint-free roller and allow to dry. The process is repeated 3-5 times;
- After the last layer of varnish has dried, you need to rub the surface to a shine, this can be done with a soft cloth. Polishing should be done without pressure in a circular motion.
In the photo before and after you can see how to update the old furniture wall with your own hands. If you follow the instructions and apply design methods for decorating furniture, you can get an excellent result that will become the pride of the apartment owners.
Despite the fact that Soviet-era furniture is quite reliable and strong, it is not considered beautiful, let alone competing with modern furniture. In addition, by this time it was pretty worn out and in need of repair. Even in such conditions, the owners are sorry to part with it. To buy a new, modern one, you need a lot of money, because furniture has always been not cheap, and it is not cheap even now. In this case, there is one alternative option to leave the old furniture and not buy a new one - this is to try to update the furniture with your own hands, giving it an attractive and modern look. Cabinet furniture is quite easy to remake, especially since there are all the materials necessary for this. In any case, it will be much cheaper to purchase materials for remodeling furniture than buying new furniture. One of the easy and affordable tricks is to change the color and replace the hardware. There will be no special problems with fittings, but with a change in appearance, everything is much more complicated. There are several options, but two are considered the most common - painting and gluing a special film or wallpaper.

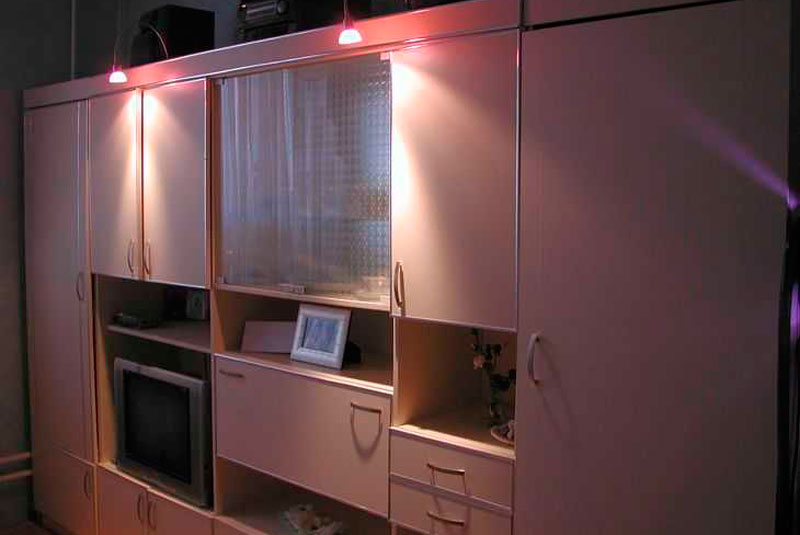
The most affordable and easiest option is to paste old furniture with self-adhesive film. On sale you can find a film for every taste, both color and monotonous, of various colors, shades and textures. Many prefer wood effect film, but there are other options that meet the spirit of modernity. This approach can really turn an old wall into furniture that will have an attractive and modern look. It is not at all difficult, it is enough to do your work slowly and carefully, which will allow you to get an interesting result that deserves attention. To see this, just look at 2 photos. In the first photo, an outdated Soviet wall made of chipboard, and in the second - the same wall, but after renovation.

The wall has received a new appearance thanks to the use of compacted self-adhesive furniture film, cream color with a matte surface. Where there was an open part of the wall, there are glass doors pasted over with a translucent matte film. For edging used furniture layout, chrome colors, and also self-adhesive.
The work consists of the following stages:
- The old wall is dismantled, everything that is not needed is removed, including accessories.
- All surfaces are cleaned of dirt and degreased. To do this, use a soft cloth and detergent. After that, the product is washed off with warm water and vinegar and finally the surfaces are wiped with a dry, clean cloth.
- Fragments of the required size are cut out of the film, with a margin of up to 1 cm. After pasting, the excess film is cut off with a clerical knife.
- The surface before pasting is irrigated with water from a spray bottle. A wet surface will allow you to accurately position the film, as it can be moved, or even peel off if the first time it was not possible to glue it well.
- Before pasting, the protective film is removed from the film, after which it is laid on the surface. Having correctly positioned the film fragment, they begin to smooth it with a soft cloth in the direction from the middle and to the edges. The main thing is that there are no air bubbles under the film. In this regard, all work is done slowly and very carefully.
- When bubbles form, they are pierced with a thin needle and the air is expelled from them. This operation is also carried out with a rag, moving from the edges to the puncture point. After that, this place is carefully rubbed with a rag.
- After the film is glued, a thin cotton fabric is taken and superimposed on top of the film, after which an iron with an average heating temperature is used. The fabric is ironed along with the film.
- In conclusion, the finish (edging) is glued and fittings (handles) are installed.
- This technology is applied to each glued part. Glass is glued in the same way, only from the inside. After complete assembly, you will get a completely new furniture wall. In this way, you can breathe a second life into items such as bedside tables, chests of drawers, cabinets and kitchen furniture.
After the wall was successfully pasted over, the old cabinet was also updated and installed on the right. As a result, it turns out that the entire wall is filled with updated furniture. Using the same technology, you can also update old kitchen furniture - stick a self-adhesive film and replace the handles.
There is a second option for updating furniture, which is less expensive and, most interestingly, you don’t need to disassemble anything. In this embodiment, only furniture doors are pasted over and not with a film, but with non-woven wallpaper. PVA glue is used for pasting. So that the edges of the wallpaper do not bulge, they are cut into blanks, the size of which is 5 mm smaller than the size of the doors. Judging by the photo below, the result is not bad at all.

The advantage of such a finish is that the finish can be replaced with new wallpaper at any time.
As a rule, the surface pasted over with wallpaper lasts for five years. A similar technology was used in the finishing of the kitchen set. To make the surface washable, the wallpaper is covered with two layers of PVA glue. The most important thing here is to do everything carefully so that smudges do not form, since you will have to work with a brush.
Alternatively, the wallpaper can be varnished, but before that it is better to experiment on unnecessary wallpaper. It is important to determine what will be the reaction of the wallpaper to the varnish. When choosing a varnish, you need to know that acrylic and cellulose give a transparent surface, and polyurethane, after a certain time, will turn yellow. Polyurethane varnish is practically not amenable to the action of solvents and, if it is necessary to remove it, then mechanical action will have to be resorted to. Usually, coarse sandpaper is used for this or an electric drill with a nozzle is used.
How to update a chest of drawers
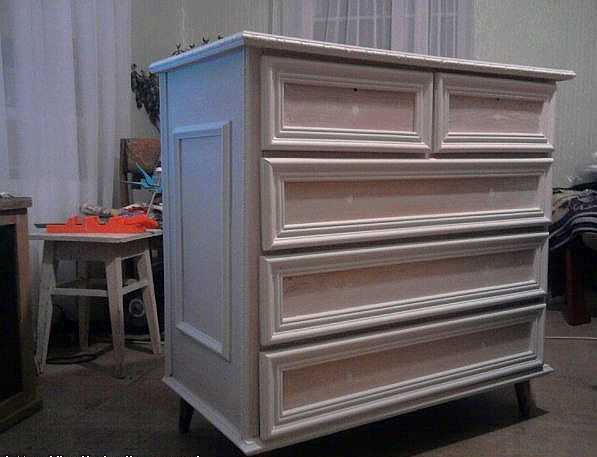
An old chest of drawers can stand in the attic for several years and lose only its appearance. As a rule, the old lacquer coating cracks, but otherwise, modern furniture can envy it. It does not dry out and remains as reliable and strong as it was before. In this case, the chest of drawers undergoes a more complex update, using painting and decoration, using polyurethane molding and wallpaper.

Stage number 1. All fittings are removed from the chest of drawers, after which the old coating is removed. As a rule, the old varnish coating is removed mechanically using sandpaper (large). All shells, cracks and chips are sealed with putty and wait for it to dry. After complete drying, the surface is polished with a fine emery cloth. The result is what is in the photo below.

Stage #2. Installation of polyurethane moldings. The main task is to choose the right moldings so that they are neither small nor large. Basically, products up to 5 cm wide are selected and very narrow if you look at them in profile.
Acquired moldings are very carefully and accurately cut into segments of the required length, and the corners are cut at an angle of 45 degrees. At the same time, care must be taken to match the pattern. The molding is attached with PVA glue. Alternatively, you can use self-tapping screws for reliability. At the same time, before screwing them, recesses are made for them. All recesses are sealed with putty very carefully, otherwise there may be problems when the putty dries.

Stage 3. All surfaces for gluing are treated with a primer. As a primer, it is possible to use PVA glue diluted with water in a ratio of 1:2. After the primer has completely dried, proceed to painting. As a rule, 2 coats of water-based acrylic paint are applied. Color - coffee with milk, although the photo does not match the color indicated due to poor color reproduction.

Stage number 4. Decoration is carried out on the basis of wallpaper made using silk-screen printing technology. Segments of wallpaper are cut clearly according to the size of the inner part, bordered by molding. The wallpaper is glued with PVA glue. After complete drying, the entire chest of drawers is covered with a water-based varnish in 2 layers.
Stage number 5. In conclusion, modern legs in the form of wheels for furniture are screwed to the chest of drawers and handles are installed.

If you carefully study the technology, then everything is much simpler than it might seem. Although, all stages require a certain accuracy, otherwise there will be problems with the appearance. In the same style, you can update the wardrobe. The result is not a bad set for a room or bedroom. Maybe not quite modern, but original and stylish, and most importantly - very cheap.
If old furniture has a varnish coating, then getting rid of it is very difficult. In the absence of obvious flaws, it is better to resort to the help of a primer for complex surfaces and only after that proceed with painting. This approach will minimize the effort to update old furniture.
Updating an old nightstand
The photo below shows the process of updating an old polished bedside table. First of all, polishing was removed, after which the surfaces were puttied and sanded. After that, it was painted with acrylic paint in two layers. In conclusion, paper from the gift bag was glued onto the door, thanks to which it was possible to obtain an original drawing. After that, the entire bedside table is covered with two layers of semi-gloss acrylic varnish.

All stages are not particularly difficult if you have the slightest skills. All processes correspond to the sequence of actions described during the restoration of the chest of drawers. The result exceeds all expectations.
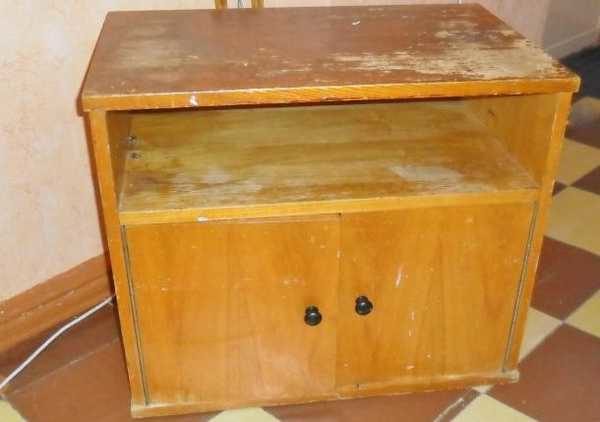 This old nightstand needs to be updated.
 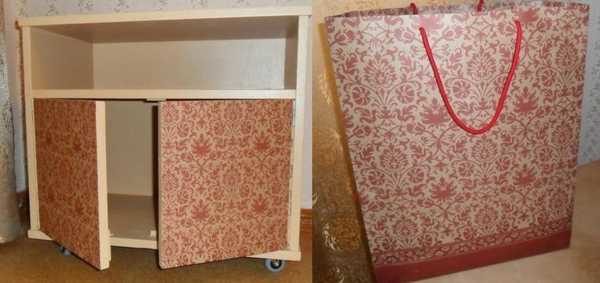 This package will serve as an excellent decor for the doors.
  The result of updating the old nightstand.
 Remodeling furniture with your own hands is simple and accessible to everyone, if there is a desire. Unfortunately, without desire, nothing will work. Above in the photo, you can see a bedside table, remade according to a very simple technique: the bedside table was simply pasted over with embossed wallpaper and varnished twice.
How to remake a table
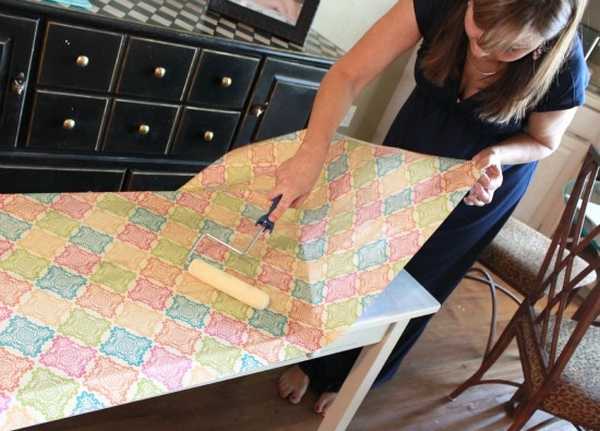
Having adopted such technology, it is enough to simply turn an ordinary coffee table into a piece of modern interior. It is simply taken and pasted over with wrapping paper. This is a thick paper that sticks without problems and does not sag under the action of varnish.
First you need to do the legs and edges of the tabletop. They need to be painted in a light color so that they fit more with the new style. After that, you can proceed to further work.
Before gluing, a paper blank should be cut out a little larger than the size of the countertop. PVA glue is used for gluing. The surface is well rolled with a roller so that there are no air bubbles. The result should be a perfectly smooth surface.
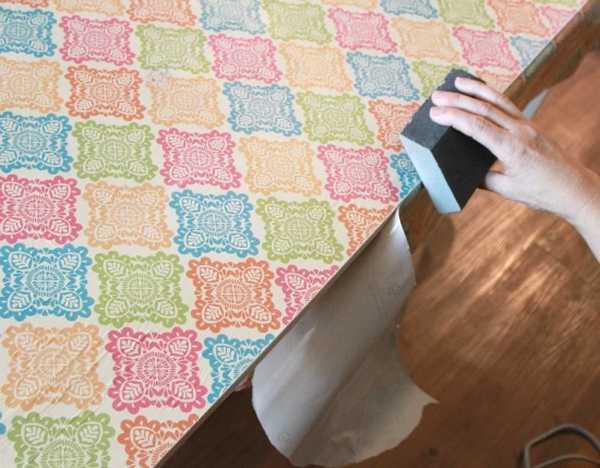
After that, remove excess material by running a fine-grained emery bar along the edge of the tabletop, pressing the paper against the tabletop. This method allows you to very evenly remove excess material, which is more like a professional action.
Finally, the surface is covered with two layers of varnish. In this case, the layers should be thin. Each layer is applied perpendicular to the previous one.

Alteration of furniture: photo ideas
There comes a time when the furniture ceases to harmonize with the design of the room. The cupboard becomes a tasteless box, disturbs you. Tired furniture can be replaced or given a new style.
There are several simple techniques that allow you to update an old wardrobe with your own hands. We will tell you how to repair vintage furniture or create an original piece of furniture from it.
Wrapping or stickers
To make an outdated chiffonier fit into the updated design of the room, add ornate flower patterns. An unusual geometric pattern created with self-adhesive film will breathe new life into old-fashioned furniture.
They are:
- standard: matte or glossy surface with a variety of patterns and colors;
- furniture for the facade, with a touch of wood or metal.
Step-by-step instructions for working with self-adhesive film:
- Prepare the facade: remove dust and stains with water and chemicals.
- Level the surface with plaster and primer.
- Mark the self-adhesive film from the inside in advance, not forgetting to take into account the allowances.
- Remove the protective layer from the inside by 2-4 centimeters.
- Stick sticky surface to cabinet
- Using a rag and spatula, smooth out the sticker.
- Carefully peel off the protective paper.

Beautiful pictures will create a positive atmosphere in the room.
Watch for bubbles. To avoid their occurrence, attach the sticker carefully, straightening the film.
On a note. If the bubbles that appear do not smooth out, pierce them with a needle.
Photo printing and photo wallpapers
The technique is suitable for the restoration of a kitchen cabinet or sideboard. Wall mural can be bought in the construction department or contact the printing house.
Print Centers will help:
- enlarge the image without losing the quality of the picture;
- make a collage of several photos or pictures;
- to apply the image on a film for gluing on a specific type of surface.
Toning
Decorate boring furniture can change the color of the facades. Instructions for tinting a wardrobe:
- Clean the surface of dust with a dry cloth.
- Also treat the inner walls with an antiseptic (vinegar will do). It will get rid of the musty smell.
- Use wood putty to eliminate defects. The color must match the details.
- After the composition dries, sand the treated areas with sandpaper.
- Coat the closet with a structuring wood stain. It should be darker than the color of the furniture.
The tinting technique is suitable for decorating a closet in the bathroom, in the kitchen or in the hallway.
Remember that this method is only suitable for natural wood surfaces.
Slate surface of doors
This decoration is becoming very popular. Slate doors are in vogue, on which you can write or draw.

Before and After - the transformation of an ancient chest of drawers
There are 3 ways:
- Sticking of a slate film to a door or a facade.
- Buying a finished board.
- Covering the door or inner wall with special paint.
Painting technique:
- Sand out bumps and scratches.
- Apply primer in two coats.
- Using a roller, treat the surface with slate or chalk paint.
- After drying, apply a second layer.
A cupboard or sideboard will shine in a new way.
Mosaic decoration
Decorating with various small details will help create an art deco atmosphere. Finishing base:
- pieces of colored glass;
- ceramics;
- shells;
- beads;
- sea pebbles;
- artificial flowers.
You can attach the elements to the cabinet with colorless rubber-based glue.

Expert opinion
Victoria Chernikova
Decorator
Before starting work, draw a sketch of the future composition. Arrange the elements on a flat surface to present a visual image. So the drawing will turn out neat.
Mosaic decor will add brightness and elegance to the interior. This design is suitable for any closet, if the style of the furniture matches the design of the room.
Aging
Cabinets painted with a dry brush will look elegant, which leaves behind only a part of the paint, creating the effect of time (only for wooden furniture).
Artificial aging method:
- Paint the surface a color that is a few shades darker than the original. Choose a shade according to the color scheme of the room.
- Wax some areas. You can use a regular candle.
- Paint the closet a light shade such as cream or beige.
- Wipe the surface with sandpaper, so scuffs will appear.
An easy way to give an antique look to a cabinet is craquelure. The varnish of the same name is applied to the surface. After drying, small cracks appear on the facade paint.

Kitchen drawers are aged with craquelure
Decoupage
The peculiarity of this design is a smooth transition from the picture to the color of the cabinet.
Use patterned napkins as materials for decoupage, so you create the feeling of painting on furniture. The composition can turn out to be clear, with watercolor gaps.
For cabinetry:
- cut out the image or use the whole napkin;
- divide it into layers;
- paste the picture;
- cover the dried surface with varnish.
Decorative rivets
To add brutality to old furniture, you can attach metal parts to the cabinet. For lovers of loft design or steep punk, it is recommended to decorate the doors and the facade of the cabinet with rivets or nails with decorative hats. With such accents, even standard IKEA furniture will look like a pirate treasure chest or a cabin on a ship.

Glue the metal parts to the facades. If the surface is upholstered in leather or thick fabric, nails will be required to securely attach everything. Combine metal fittings with other decorating methods (paint or fabric) for a personal touch.
Inlay
This is not gemstone decoration, but furniture decoration with overhead elements:
- vinyl napkins;
- embroidery;
- lace.

It is not necessary to buy new furniture in order to make your home more modern and functional. Take a cue from this inventive guy who was able to make wonderful things out of old pieces of furniture that had fallen into disrepair! It is not often that you see such useful and nice interior elements…
How to convert furniture from old to new
Cooking
- When babies grow out of their crib, it's time for them to start reading and writing. Make from a crib school desk- brilliant solution!
- The crib can be transformed into a special one for a variety of children's activities.

- Perfect example bathroom decoration.

- Incredible adventure TV.


- It is not clear how and why this kid had carts from the store at home. But they turned out great chairs!

- Blimey! Second Life ordinary wall. It turned out great!

- Kitchen chairs can get so cute garden bench.

- great example contemporary sofa. Yes, your eyes do not deceive you, it is made just like that.

- Organizer for many household items. It's really easy to make it!
- Turned out wonderful.

- old postal the box can be such an original interior decoration. Incredibly romantic!

- Ideas to use old pianos. If the tool cannot be repaired, you can arrange such a beautifully organized space.


- Bicycle in the bathroom- very stylish and convenient stand for different things. Decorative bike, just think!

- Here's how to adapt.

- Ottoman from old magazines! I will definitely make this one.

Organize your home space in the best possible way. Maybe these will help you
Often people do not even think about how many items of furniture that are amazing in beauty and performance are nearby. Dilapidated chairs, tables, a chest of drawers, an old sofa or an armchair, inherited or bought for a penny, never fit into the interior of a modern apartment, so they often become a burden and go to the country. At the same time, a relatively simple reworking of old furniture, which takes a couple of days off at most, will allow the rarities to return to their former brilliance and beauty. Unless, of course, you know how to properly handle such items.
What can be done with old furniture
Until quite recently, only connoisseurs, collectors and professional restorers were interested in old furniture. Today, the alteration of interior items has become a colossal business, the existence of which many do not even know. Therefore, before throwing away or sending old furniture to the stove in the country, you can try your hand at restoring and reworking old items, at the same time increasing their cost by an average of 10 to 50 times.

It goes without saying that for high-quality alteration and restoration, considerable knowledge, work skills and special tools are needed. Nevertheless, even for a non-professional restorer, remaking furniture with your own hands is quite an affordable activity, but in a somewhat abbreviated version:
- If the old structure has retained the strength and main details of the cladding and load-bearing elements, it is possible to restore the paintwork, re-upholstery and alteration of upholstery and replace wooden parts hidden from view;
- If the restored items are in a terrible state, the missing elements of the cover, cladding, legs, drawer fronts, countertop surfaces can be restored and reworked using modern materials. In this case, antique furniture will turn out, with obvious signs of a remake, but retaining the features of old rarities;
- Complete refurbishment of old stuff. From old tables, chairs, chests of drawers, cabinets, only frames and drawers are preserved, everything else is radically subject to alteration into stylish and modern furniture.
Any work on the restoration and alteration of old interior items requires a separate, dry and well-ventilated room where the wood can be varnished and dried without the risk of harming the health of the household.
Important! The most difficult stage is the upholstery of upholstered furniture, upholstery of chairs, sofas, ottomans. Such work is best entrusted to an experienced master.
The simplest version of furniture alteration is known to almost everyone. This is a plywood surface of old cabinets, sideboards, furniture walls, Soviet-made kitchen furniture with laminated films. The old lacquered surface of chipboard furniture boards has long faded and lost its attractiveness, so reworking with a film will significantly refresh the look. It is enough to buy a self-adhesive film “for water”, stock up on a clerical knife, a set of rulers, a spray bottle, a dry napkin and a place for cutting the film.

We remake the cabinet in the following sequence:
- We release furniture from drawers and accessories;
- For each item, we cut out our own pattern of the film, with an allowance of at least 3-4 cm per side;
- We wipe the old surface from dust, spray it from the spray gun and carefully stick the film;
- With a napkin, carefully squeeze out air bubbles, as when gluing wallpaper.
For the most persistent bubbles, the film can be pierced with a needle. After drying, install the handles, fittings and return the cabinets and doors to their place. This way of reworking old furniture will take a maximum of one day off.
Options for reworking old furniture
The easiest way to work with old lacquered furniture, reworking and restoring a chest of drawers, coffee table or old chairs is much easier and more affordable than you might imagine. To work with old paintwork, you only need a wash of the old varnish, polishing sandpaper, high-quality varnish or paint, and sometimes repair compounds for veneered surfaces. It is worth making a reservation - only furniture made from solid wood, or prefabricated structures lined with natural sawn veneer, is subject to cardinal alteration. Any options for furniture made of chipboard are not subject to restoration, the maximum that is possible is to paste over with a film.
We restore old wooden furniture, chairs, cabinets, countertops
First of all, it is necessary to carefully disassemble the piece of furniture, remove any contaminating residues of paint, varnish.
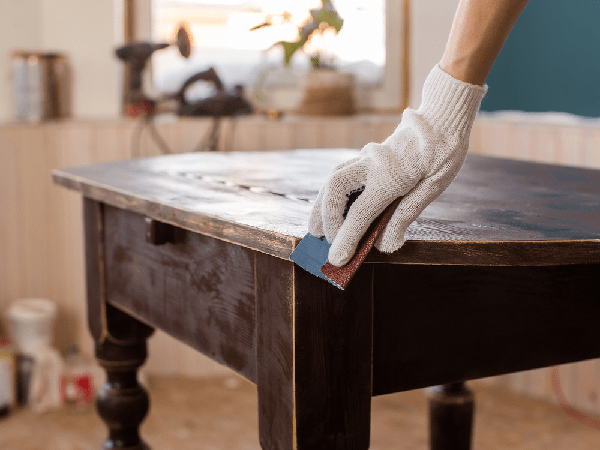
The easiest way to remove old varnish is in three ways:
- Chemical wash, most often a mixture of acetone, alcohol and 647 solvent;
- Clean with sandpaper;
- Heat with a hair dryer and carefully scrape off with a sharp knife, then manually sand with sandpaper.
Note! As a rule, old furniture undergoes repeated painting over a long life, so the most difficult thing in such an alteration is to carefully remove the old paint and varnish.
If everything is done carefully, then the further part of the alteration will be within the power of even a child. It will be necessary to cover the wooden surface with varnish, preferably under mahogany or ebony.


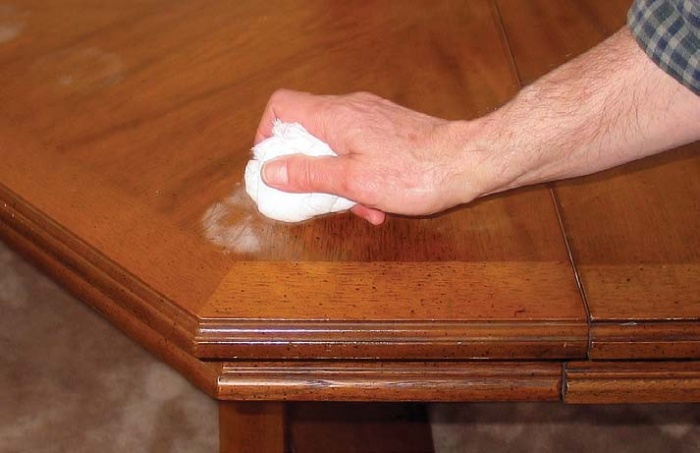
When restoring countertops, the most common defect is a chip on the edge of the polished surface. In the old days, the defect was filled with acrylic paste and painted with alkyd enamel. It is clear that such an alteration is tantamount to destroying the table, so it is easier to restore the old polishing with a special tool.

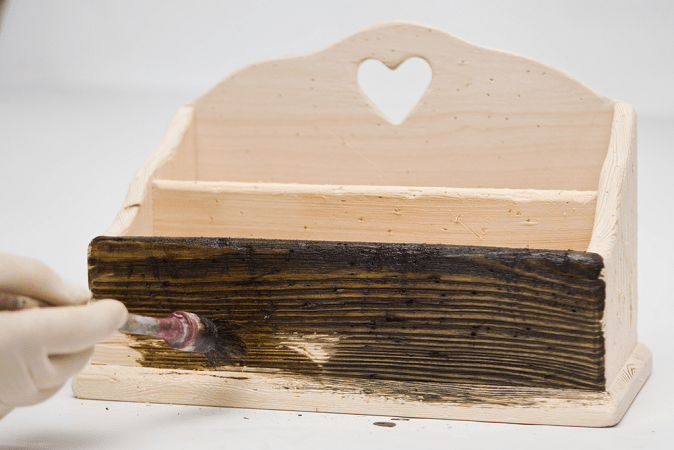
Often, during the rework, you have to replace some of the old rotten, cracked or lost pieces of furniture with new parts. For example, for an old dresser or wardrobe, you can make new drawers.
To make the details look old, it is necessary to apply traces of bark beetle with dots with an awl, and traces and abrasions are imitated with a bronze brush.

After reworking, the wood of the box is bleached and painted to match the old furniture.

Advice! If you do not have the opportunity to choose the right coating during the alteration, then it is better not to paint the old furniture, but leave the natural, cleaned wood texture.

Sometimes, during the rework, you should not strive for the complete authenticity of the restored copy, this is within the power of professionals. If the old furniture is in extremely poor condition, then instead of an unsuccessful alteration, it is better to make an adapted version of the new furniture from it. For example, a very good idea is to convert an old chest of drawers into a new sofa.

To do this, cut off the worn-out upper part - the lid and the front part, leaving only the frame with legs. After installing the stand and laying the soft pillows, you get a very nice sofa.
The most successful examples of reworking old things
Not everyone can handle the time-consuming cleaning, varnishing and polishing of wooden pieces of furniture. There are two ways to simplify the rework process - choose an unusual style for a new coating or refuse to use paints and varnishes at all. For restorers, who are rightfully considered trendsetters of style and rules in matters of reworking furniture, the worst solution is the usual painting with paints, no matter what, acrylic or expensive powder compositions.

For example, old wooden furniture - a cabinet or a chair, which has the style and beauty of lacquered wood, after painting, turns into a dull monochrome trash.

The exception is black and white varnishes. If you like painted furniture, use glossy, non-translucent white or black paints. This alteration will give style and a spectacular look to old furniture.

Sometimes several colors are required to enliven the space of a room and the interior, in which case painting, applying themed drawings to the countertop or front part would be a good solution. This will not only not spoil the item, but also make it original. True, its price, as a rarity, will decrease several times.

The option of reworking an old bedside table with the help of pasting with newspapers and varnishing can be called ingenious.
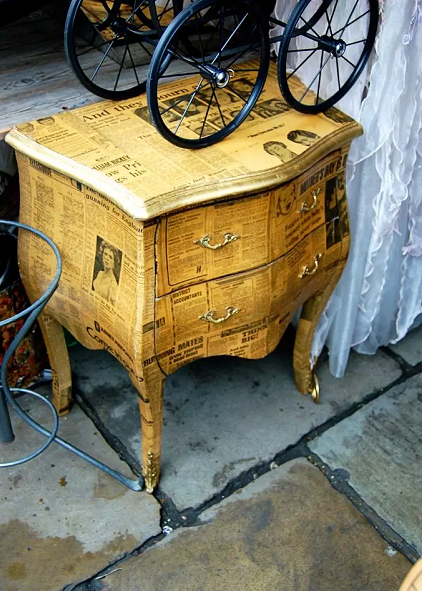
Such a product can be safely put up for auction of old things - demand and positive feedback are guaranteed.
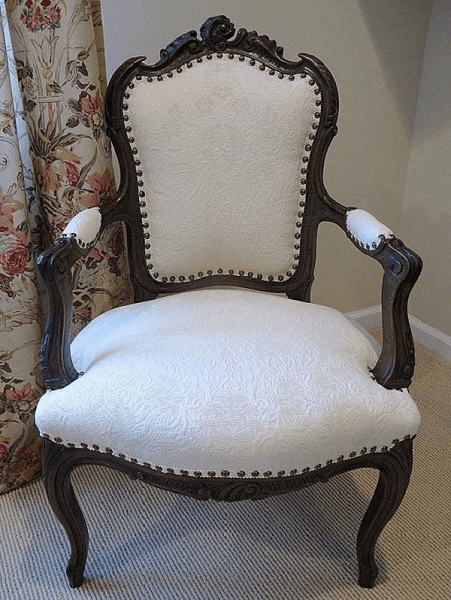
Separately, it is worth mentioning a very special category of old furniture - chairs of the author's work with elements of carving and faceting. If you still have such items, know that they are worth it to go through alteration and be restored by the hands of the master. Firstly, walnut chairs are very beautiful in any setting and are highly valued. Secondly, any author's furniture of a famous master of the beginning of the last century can cost very good money.

Often, the owners, starting with the alteration and restoration of one chair or table, collect entire sets of restored furniture. Interestingly, the results of a relatively simple alteration every year will only grow in price and value.
It is clear that it is possible to restore and remake not only old wooden objects. An ordinary office chair after a reupholstering can also become part of an antique setting.

Conclusion
Restoration of old furniture does not require special equipment or technology. This is the case when the main decoration of a table or an old chest of drawers is not the ideal shape or color, but the visible labor invested by people in the manufacture and restoration of the item. If you are lucky and the furniture has been preserved with minimal damage, then it is best to leave the maximum number of original details, paintwork, and fittings. Furniture will only benefit from such a rework.